Bicycle Helmets Are Still
Your Best Insurance
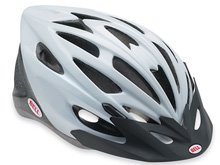
Bicycle helmets are the most important items of bicycling equipment. Medical research shows that helmets prevent 85% of head injuries.
With all of the cooling vents, and their light weight, they are more comfortable than ever and you soon forget that you even have it on.
Most are made from a very tough polycarbonate material designed to be highly impact resistant.
They have foam linings, to cushion impact, and as many as 27 vent holes to funnel the air over your head to keep you cool. Most are made in a one piece mold with built-in reinforcements.
The main differences between bike helmets are the materials, number of vent holes, and the fit adjustment system. The more vent holes the tougher the material has to be in order to maintain the necessary strength and the more reinforcements< are required in the mold.
Mountain bike helmets are more rugged for greater protection and with less vent holes. The odds the rider crashing are greatly increased when riding over rough and hilly terrain.
When it comes to mountain biking don't even think about riding without a helmet
 |
Helmets have a variety of different adjustment systems to aid in obtaining the proper fit. They are intended to be worn with the front about two finger widths above your eyebrow. It may look cool to wear them tilted toward the back of your head but they won't be nearly as effective when worn that way and the fit will be too lose. |
Click here for an excellent article on helmet safety
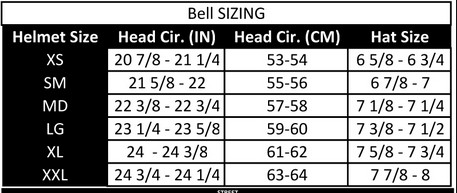
Guidelines for helmet sizing
When sizing a bicycle helmet, a good estimate can be determined by measuring the circumference of your head (if you don't know your hat size) and using the following basic guidelines.
You will probably need to play with the adjusting system for a while to get the optimum fit which should be snug without being uncomfortable. But,it's well worth the trouble.
Here is a great article on How to fit bicycle helmets from the Bicycle Helmet Safety Institute
A short version of our instructions for fitting a helmet.
Bicycle helmets are not hats! They must be level on your head and
strapped on securely to be protective in a crash. You want the helmet
to be level on the head, with the fitting pads inside touching all the
way around and the strap comfortably snug.
First, adjust the fit pads or ring
Most bicycle helmets come with extra foam fitting pads to customize the fit. You can usually remove the top pad or use a thin one there to lower the helmet on the head, bringing its protection down further on the sides. Use thicker pads on the side if your head is narrow and there is a space, or add thicker pads in the back for rounder heads. Move pads around to touch your head evenly all the way around. If you have a "one size fits all" model with a fitting ring instead, just adjust the fit by tightening the ring if needed.
Then, Adjust the Straps
Put the helmet on, level on your head. Adjust the rear (nape) straps, then the front straps, to locate the Y fitting where the straps come together just under your ear. You may have to slide the straps across the top of the helmet to get them even on both sides. Then adjust the chin strap so it is comfortably snug. Now adjust the rear stabilizer if the helmet has one.
Are you done?
Shake your head around violently. Then put your palm under the front edge and push up and back. Can you move the helmet more than an inch or so from level, exposing your bare forehead? Then you need to tighten the strap in front of your ear. Now reach back and pull up on the back edge. Can you move the helmet more than an inch? If so, tighten the nape strap. When you are done, your helmet should be level, feel solid on your head and be comfortable. It should not bump on your glasses (if it does, tighten the nape strap). If it still does not fit that way, keep working with the straps and pads, or try another helmet. First, adjust the fit pads or ring
Most helmets come with extra foam fitting pads to customize the fit. You can usually remove the top pad or use a thin one there to lower the helmet on the head, bringing its protection down further on the sides. Use thicker pads on the side if your head is narrow and there is a space, or add thicker pads in the back for rounder heads. Move pads around to touch your head evenly all the way around. If you have a "one size fits all" model with a fitting ring instead, just adjust the fit by tightening the ring if needed.
Then, Adjust the Straps
Put the helmet on, level on your head. Adjust the rear (nape) straps, then the front straps, to locate the Y fitting where the straps come together just under your ear. You may have to slide the straps across the top of the helmet to get them even on both sides. Then adjust the chin strap so it is comfortably snug. Now adjust the rear stabilizer if the helmet has one.
Caution:
If you do have an accident, and your helmet is damaged in any way, you need to replace it. The foam liner will not return to it's original shape after a high impact and even small cracks can cause the outer shell to shatter if it receives another impact.

Return from bicycle helmets to accessories