Bicycle Sizing And
Setup Fundamentals
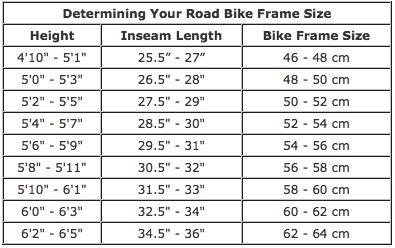
Often the frame sizes are given in metric dimensions. This is especially true with road bikes. So you may want to convert the metric dimensions to inches.
For a road, hybrid, or cruiser bike you can determine the frame size while standing over the top tube you should have 1 to 2 inches clearance between the tube and your crotch. For a mountain bike the clearance should be 3 to 5 inches. So the style of bike that you choose will determine what size will be the best fit.
Bicycle sizing is usually more critical for a road bike since they are, generally, ridden longer, and faster, and the riding position is less upright. Riders will need to do a lot more tweaking to maximize power and comfort.
Bikes with step through frames often only come in a few frame sizes. Just follow the manufacturers recommendations for sizing according to your height.
The following tables can be usefull guides as well.
Road bike sizing table
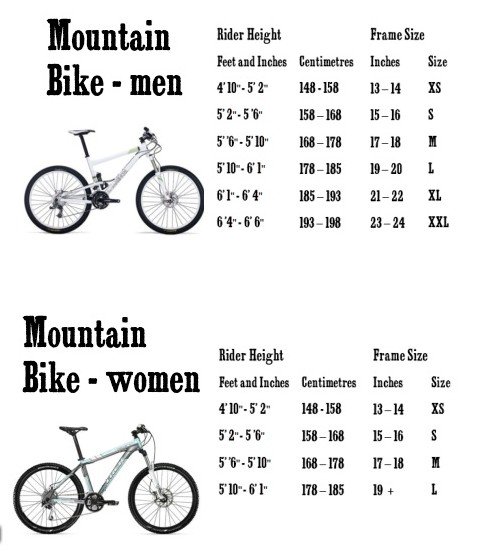
Mountain bike sizing tables
Seat positioning
 |
A good starting point for positioning the bicycle seat is level with the ground, though you may find your optimum position is with the front tilted down just a few degrees. |
 |
The height should be about the same height as the handlebars. Another often used reference is to position the seat .833 times the length of your inseam from the center of the (pedal) crankshaft. You are probably going to need to tweak the seat height so that while seated, with the bottom pedal at the six o'clock position, (you should always pedal with the ball of your foot) your leg should be not quite straight. |
If the seat is too low, and your leg is not extended enough, you will risk having knee problems. If it is seat is too high you will twist from side to side as you pedal and your butt won't like that at all. Fore and aft positioning is important as well.
You should position your seat so that a plumb line dropped from the bony protrusion in front of your kneecap falls on the center line of the pedal axle to a maximum of 1/2 inch behind the center-line when the pedal is positioned at 3 o'clock. Riders that have a fast pedal cadence will likely have to set this position on the center-line and those with a slower cadence prefer a position a bit behind the center line.
You will need to ride for a while and make a few adjustments to find the sweet spots that work the best for you. Also, don't be afraid to take your bike to a bicycle shop and have them set it up for you. They will charge you a few bucks but it's worth it.
Return from bicycle sizing to home page.